Search This Blog

Friday, January 31, 2014

Changing Gears

A rather unattractive person told me, "Racing is an infection. Once it gets in your blood, there is no getting it out." This certainly holds true. From the first time I said "Wwweeeee", but as a small child so "Wweeee" I knew I could never legitimately stop wanting to race something.

So after more than two years, I'm not only starting up this blog, but I am racing again. This time I am actually in a league, so this is going to be literally the best year of my life to date. The title was not meant to mislead, I am indeed changing gears because I am no longer driving karts. I said 'to hell with it', I actually said these words. Did my research, grabbed a coworker, went to a near-by dealership and bought Angela. A Kawasaki Ninja 300.


But rather than give you a story of my last year riding motorcycles, I'm just going to jump to the chase. After 4 1/2 months of riding, I decided I needed to start racing again, and bikes were going to be my outlet...

Race the 300? Nope... it costs too much to replace 5-6x a year.

So what to race? Minibikes were the final result.

So I took a class. For $50 they lend me a suit, a bike, and gave me a solid 2 hours of instruction on how to man-handle the tiniest bike known to man, and it was the most educational 2 hours ever.


In my first weekend... I crashed 11 times. That wasn't a typo.
fun fun... but im not exactly a small person... so the actual race was not bringing in the ladies.

Having enjoyed myself I went out and bought a CRF50 of my very own to go racing on... I seriously underestimated how bad I am at this. But so what, I had just completed my first legitimate race and it was excellent!


That's me... last off the start line since I outweigh everyone by about 40-80 lbs, at the first corner, I was already 5 seconds behind. I received the nick-name "Crash" that weekend.

And some video of the race:

M1GP 2013 Round 7 (Santa Maria) 50cup Full Race from M1GP on Vimeo.


That was all good an fun, but anyone who is willing to crash 11 times in a weekend is surely insane and willing to try something way above his own head right?

That's absolutely right!

So what better way to learn how to race than to do a lot of it. So with precisely 1 race under my belt on the CRF50... I decided to join a team for a 24 hour race on an NSR50... now the names don't mean much to most so let me put two pictures side-by-side.


The CRF is exactly as it would appear in the pics above... it is a bike for 5 year olds. The NSR is an actual race bike with a small motor. Even though it is the same size engine, it produces 2x the horse-power, but more importantly, it handles like a dream!

Now this bike was the team's bike and we'd barrowed it from one of our competitors who was cool enough to lend it to us... But, with virtually no racing experience, I proceeded leaped face first into a proper race and managed to log 5hrs and 30 minues of those 24 hours and completed on the order of 450 laps... I was tired. It was miserable, it was cold, it was exhausting, and I will definitely do it again. Quite the experience.


Picture my #1 fan took of me when she surprised me and came to watch me race.


But Mark, surely there are tales to tell of that race? There are, lots of funny tales, but I'm more interested in the future... the future is my own first season of racing. With my own NSR50 of my very own.

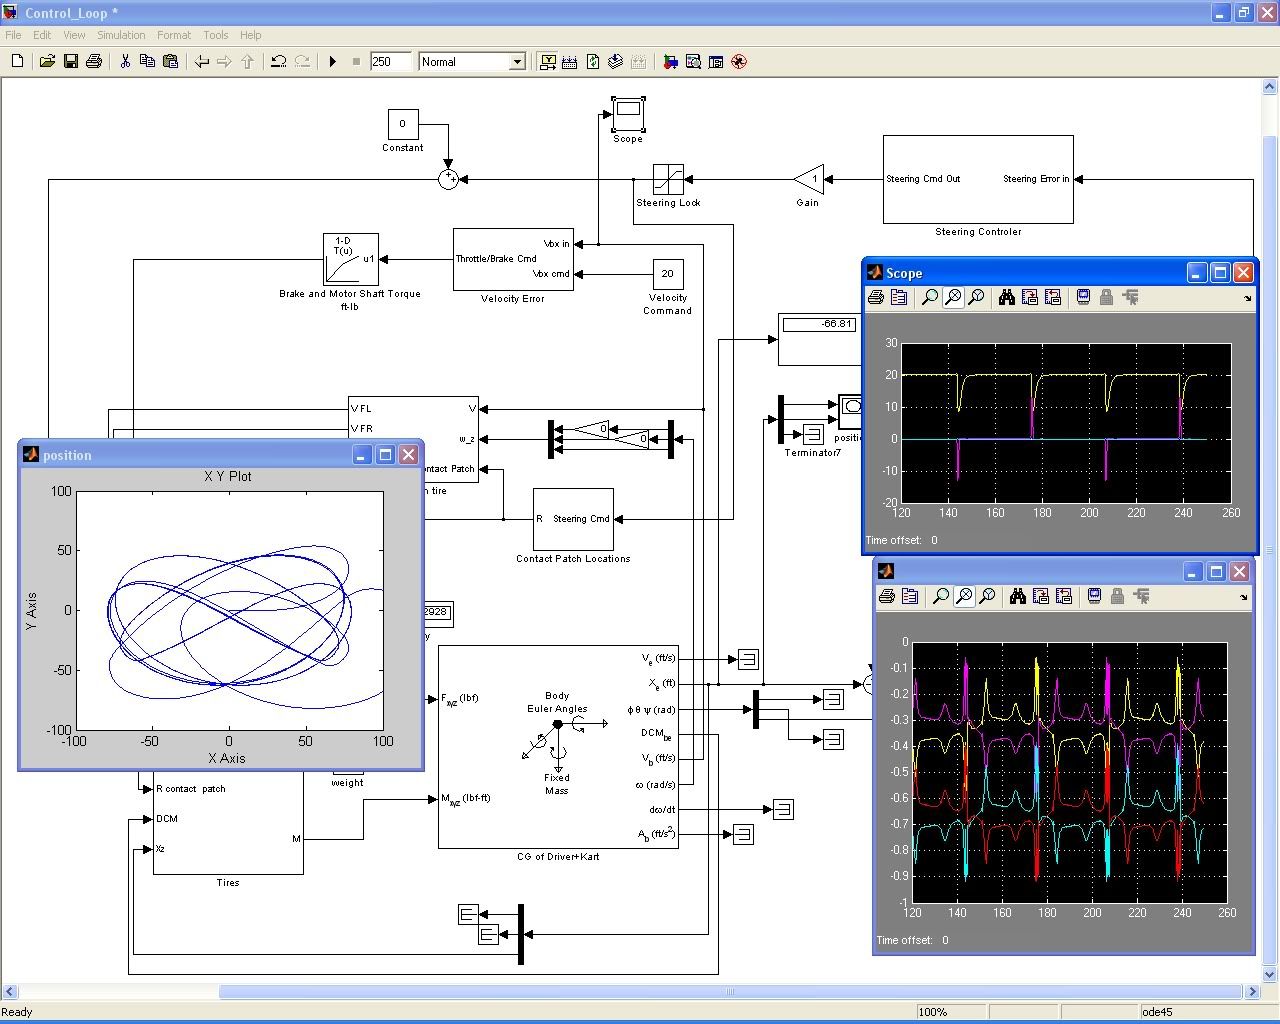
THUS this blog will continue to same technical discussions as before about the karts, but now it the dynamically complex world of motorcycles. I have spent about a year now just coming to grips with how tied together everything is on these machines of beauty, and while the karts to super fast and super aggressive, nothing can shake a stick at the fun and complexity of a motorcycle.

So I will end this first rebooting post with a short video of me taking out my new baby, Wren, out on the track. Onwards and follow the shiny Golden Helmet!

PS: I thought the helmet was yellow when I tried to buy it online, but it was too ridiculous to send back. So I went with it.


Tuesday, June 7, 2011

Update on Simulation for May and June

I was stuck for a long time on figuring out how to teach a computer how to not drive like a mindless noddle. Last time I'd posted, the computer would simply continue to turn the wheel more if it was unable to make the turn, with no regard for the loss in friction at higher slip angles. Well the computer is still stupid as can be. It'll drive a line like crazy, but if it enters a corner too fast, or tries to turn too hard, it is still clueless what to do.

This problem enters into the realm of non-linear control theory. I'll be honest, I'm lost at this point. I tried some clever schemes. I implemented what is known as the 'returning moment' into the calculations done in each of the tire blocks and attempted to use this.

For those that don't know what 'returning moment' is. When you turn the wheel on the car you'll notice that usually if you let go, it'll recenter itself. This is not your car being clever, it is simply because you are deforming the tire to make the turn happen, it turns out that the 'centroid' of all this deformation is behind the axis of where your tire rotates (the vertical axis that is). Since it is behind the axis, the system will attempt to correct itself when left alone. As anyone knows who has ever lost control of a car (whether accidental or intentional) will know that this force gets really small when the tires are sliding. This decrease in returning moment is something every driver knows as an important part of 'feeling the car'. This drop off in returning moment occurs just before the peak grip on a tire's alpha angle.

By attempting to inform the computer that if it is trying to turn the wheel more, but the returning torque is decreasing, that the car is starting to slide. At this point the computer needs to ease off the wheel to maintain the maximum turning power. This will be the first step in educating the computer, later on I would like to rewrite this entire control algorithm in favor of a 'balancing-act' method with the kart. This would involve feathering the throttle and brakes to maintain maximum grip in addition to just how he turns the steering wheel. Allow the computer to determine which combination of x and y forces can put as much weight on as many useful tires as possible.

This worked just fine as far as the results, but made the computations take forever! Not because the additional calculations were difficult, but because the ODE solver had to take such small steps to resolve a stable solution that it was impractical. This is where my limited non-linear control's experience showed. I will have to spend a while studying up in this area to formulate an efficient method. Once this is done, then I see little reason why rapid convergence isn't possible.

Some have asked why I don't just limit the turning angle to the maximum grip angle. First, this isn't realistic, especially for when I add variable conditions. Second, the max angle alpha isn't a known function of the turn angle of the wheel. In short, I can't do this anyways.

Since I want to keep the project going forward, I elected to come back to this problem later and did something that 'imitates' the driver being very good at holding the peak traction, I simply made the curve flatten out at the peak value and have it stay there all the way out to large values of alpha. This obviously isn't a suitable final solution. While the traction calculation is 'correct' the direction of the total force vector is in error. So eventually I'll come back to this.

The changes completed today involved migrating the code towards an optimization-friendly setup. Rather than going through all of the blocks I've shown pictures of, I can now specify any parameter before calling the simulation. This means that I can have the computer mess around with how the kart is setup, then take it out for a test drive, and tell me how it did.

Additionally, I have added greater fidelity to my tire model. I now take into account the effects of camber on the pressure distribution and resulting traction forces on the tire. This is huge for optimization, since the majority of the parameters one can change for the suspension on a kart effect how the tire meets the road. I also added the needed calculations to determine the camber angle at each tire for every time step.

I am going to setup and run a handful of case studies to confirm the effects of various camber setups. But those results will have to wait until next post.

Wednesday, May 11, 2011

Front End Geometry Complete

So I changed my mind on what to work on next. I completed the front end geometry instead. So now I can customize, camber angle, spindle geometry(which includes scrub radius [how far out the wheels are])], king-pin inclination, ride height, (technically I have caster), toe angle, and if I desire (which I will add soon) modify the Ackerman geometry (but honestly that's easy to do).

The primary driver behind doing this now was to complete the weight transfer to and from the rear tires. Karts have a HUGE king-pin inclination. If you have actually read this entire blog (which I'm sure no one has), I had to replace this pin a while back. By having this inclined so steeply, when the steering wheel is turned, the front tires actually move vertically about an entire inch (my ass is only 1.5" off the ground to start). Both tires do this in opposite directions, this twists the chassis and that results in shifting the weight to the outside rear tire. This is all done even without moving. As I mentioned in the last post, it is very important to unload the inside rear tire for stability reasons. This allows the tire to become unload immediately, even before the kart has actually starts to accelerate into the turn. So modeling these effects was critical to this simulation.

Here's the best part about math, if you do your job right, sometimes the math will surprise you by showing you 'features' you hadn't yet anticipated to happen. I was digging around the code for at least 20minutes looking for the error when it dawned on me, that there was no error at all. In the picture below you will see the rather trapezoidal shape to the chassis twist angle. I was wholly expecting this to be a smooth sine wave (like the graphs above and blow it, which are the actual vector components of the wheel spindle going back and forth). Turns out, that something I was going to test next, was already happening. If you will look at the tire-deformation chart on the right, you'll notice the inside rear tires are getting picked-up off the ground completely. So the chassis stops twisting more and just rotates entirely instead.


This is completely realistic if the chassis is stiff enough. I have not actually calculated respectable values for this, I just picked something from intuition. I'm glad to see it wasn't far off at all in the end. I will soften the chassis only a little more until I get some actual test data.


So some conclusions/understanding to apply to your kart
 If you want to unload the inside rear tires more, you have a couple of options...
-If you want this to happen more quickly at the start of a turn (i.e. your kart feels heavy to turn-in at the beginning of a turn), then you might want to either increase your scrub radius, increase your king-pin inclination. Each of these options will increase the vertical travel of the tires. If that doesn't work, try to increase the chassis stiffness by using the torsion bars. This allows for the twisting at the front, to more effectively lift the rear tire.
-If the rear tire just doesn't seem to come up during the turn, you can either loosen up the chassis stiffness (front is more effective than rear I believe). This is opposite of above because while in the turn, the dominant force is the actual G-loading pulling your over, while at the start of the turn, these forces really aren't there. So loosening up the stiffness allows the kart to roll over more.
-If your kart seems to skip/hop during a turn (not while starting it) from the rear touching down, most say continue to loosen the stiffness, I say try stiffening it up a little bit if you're already loose. Reducing the stiffness of your chassis too much will decrease your overall grip because you're going to allow the chassis to roll too much and this forces the tires to increase/decrease their camber angles to the point of unloading the inside of the tires. By increasing the stiffness of the chassis you aren't allowing the tires to come up so far that you're losing grip and then slamming down your rear tire in what is known as an LCO (Limit Cycle Oscillation). So give both directions a shot. Hopefully the completion of these simulations will yield some plots that I can post for everyone's reference and remove a bunch of the guess work.

Another note, decreasing the rear tire pressure will allow for greater compliance to changes in camber. The sidewalls are remarkably flexible on our tires, this flexing allows for the tire to remain flat on the ground even when the axial is at an angle. Decreasing the pressure will allow for more sidewall flexing, but be careful when reducing tire pressure, it can blah blah blah blah legal stuff.


I might try to also complete a slightly better tire model today which accounts (to some degree) for the effects of camber.

Until then,

-S

Tuesday, May 10, 2011

Implimenting Chassis Deformation

I knew if I sat on my thinking chair for long enough I'd come up with an easier way to do this. Remember, when doing dynamics, it is usually easier to determine the response, than it is to determine the deformation. My original approach was going to be the 'start easy and build up'. Well, starting at deformation rather than acceleration was a problem. By changing to the response approach, and breaking up where I determine certain values in the model (rather than all in one place), I was able to keep the computations simple. By breaking up how I determined certain parameters, I was also able to build in the coupling (the relationship between two changing parameters: i.e. how the change in one will effect the other) I needed for the model to behave realistically. It was my fear I would need to run certain data all over the model to implement this coupling. I my ego is growing rapidly since I got it all to work on the first try. In hind-site, this was really easy.

Validation Case (i.e. test that it works/sanity check)

So here are two graphs as usual. The test I conducted to ensure the chassis was actually twisting how it should. Additionally, with this twist the deformation of the tires should behave as you'd expect when you 'lift' up a tire. So I would be looking for the other three tires to support the additional load. Imagine that I have the kart resting on the ground. Next, I remove a 1/4inch chunk of the ground from underneath the front left tire. So at the start of the simulation, the kart is all level and even, but the front left tire has no support, once the simulation starts, you can see in the left graph that the chassis begins to twist in the positive direction. Positive (as opposed to negative twist) in the coordinate system I am using is the left wheel going up and the right wheel going down. EDIT: So before the twist angle appeared to be backwards, I had come up with a "who's twisting who" explination, but it didn't sit well with me so I started investigating. Turns out my coordinate systems were inconsistent. I am using the aircraft coordinate system, with has Z-axis pointing down. Normally this doesn't trip me, but when I told the code my center of gravity was 8.5inchs +Z.... that's 8.5inches in the ground. So there's the fix and now the plots look correct.

Here's a corrected chart. I left the one below (even though it is backwards) to illustrate the validation case.


So with that justification of my results I'll now post yet another picture. Chassis Twist Angle on the left (in radians), and Tire Deformation on the right (in inches). As you would expect, the front right tire (magenta/purple) has had to deform noticeably more to compensate for the front left tire, not supporting any load. The other two rear tires also increased in deformation, but not as notedly.


Now with the chassis twist angle implemented, the next step will be:
-Improve the tire models to account for the effects of changing camber angles
-Figure out how to make the rear tires spin at the same speed (to create the solid rear axial).

These two items are particularly important in determining grip since one of the MAJOR tuning features of a kart, is changing this chassis twisting stiffness.


How Does Chassis Twisting Stiffness Effect Grip

The idea behind adjusting this stiffness is to allow the inside rear tire to lift on the ground easily enough in a turn. This is important because the axial that drives the rear tires is solid and can't accommodate the difference in distance traveled by the outside and inside tires. Since the outside tire will have substantially more weight on it than the inside, that is the tire that will stick, thus the inside tire will be trying to turn FASTER than the ground it is on.

"Wouldn't that produce a forward thrust" Some might ask.

"Yes it would." I respond

"Wouldn't that make you go faster and give you more grip than having the tire off the ground?" Sound would ask

"Yes it would." I respond.

"How is that bad?" Some would ask.

To which I respond, the force created by the inside tire would try to TURN the kart the opposite direction it is trying to turn. This is annoying not because it would require more effort to turn the kart, but also because it will push your front tires beyond their limit of grip, which then makes you lose control and spin out. Touching down the inside rear wheel essentially increases the lateral load your front tires are supporting.

On the flip side of that coin, is if you make the chassis too lose, you allow the rear end to lift off higher and higher. This rotation changes the camber angle of the rear tires (camber angle is the angle between the ground and the axial). This change in camber changes how the tire makes contact with the ground and how the load is spread out over the contact patch. Normal street tires are pretty narrow and more-or-less round from inside to outside; thus, don't easily feel the effects. Wide racing tires however are VERY flat from inside to outside. So changes in camber angle can easily lift and entire section off the ground. Thus if we allow the kart to lift up too high, the camber will reduce the grip available to the rear tire. You know this is happening when the rear end seems to 'skip skip skip skip' in long fast turns. The kart is pretty much flat and has high grip, twists and twists, loses grip and the rear comes out, kart flattens out and has high grip again.... skip skip skip. This is this EXACT case I will try to recreate to validate my model once I get all the needed components.

I LOVE MATH, I still have squat for experience and with these tools, I will be able to 'theoretically' set-up my kart optimally for tracks I will have never driven at. Mind you, the math can never be as accurate as the real thing, so 'optimal' should be taken with a grain of salt. An expression in the engineering world is "Put crap in. Get crap out" i.e. the results are only as good as the model you make. Progress is going very rapidly, but it will be a very long time until I reach this optimal point.


So until next time,

-S

Monday, May 9, 2011

Yar! Ye computer can follow a map!

Good progress has been made. I fixed the compiling error and plugged in the bare minimum version of my navigation code. It is in need of refinement, but at least it drives in the right direction. Next, I took an old code to grab data points from a picture (right center), then using Google maps I gave the program  a rough set of way-points plotted in "Command Position" (top left). The resulting actual path driven by the kart is seen in the plot titled "position" (bottom left).

As you can see from the "steering command" plot (bottom right), every time the kart nears a way-point, the driver attempts to jerk the wheel since even being a little off will make the directional error grow rapidly. This will be one of the many refinements that will be made once all the bare-bone systems are in-place.


For the critical readers out there, you will notice that my kart probably went off the track in this simulation. You are correct in this conclusion. But I am not concerned since I did not attempt to tell the computer were the edge of the track might be. That is a constraint I will eventually add; however, that won't come until I get the optimization codes running. I will add that as a constraint since I would like the optimum driving line to not involve driving over narrow sections of dirt (in therefore skip large segments of the track) to cut down lap times.

The upcoming modification to the model will attempt to modify the 'suspension' of this model to account for the significant twisting of the chassis in a turn. This will result in the kart lifting-up the inside rear tire in turns as can be seen in the picture below.


This presents a substantial challenge to the dynamics of the problem, but I am sure I'll figure it out. Confirming my model will likely be more difficult than developing it. The trick is to keep the computations simple and accurate.


So until next time,

-S

Tuesday, May 3, 2011

Just a quick screen shot

Now that the code is there, my list of things I could implement have grown considerably. But I must remain composed and professional.

The coding for waypoint selection is written, (i.e how to tell the computer, you missed that way point, but dont bother to go back and get it, just keep going down the track), but something is screwy with my matlab so I have spent the day trying to figure out something annoying.

Since my 'driver' is really dumb, he has a tenancy to just crank the steering wheel really hard to the left or right sometimes, because I haven't taught him that traction goes back down at some point. I 'could' cheat and just tell him to max out at some equation, but that would miss out on some realism down the road. If I want to model this such that I can gain from it, certain 'human factors' must be considered. So the 'feel' of when traction starts to decrease is a very important parameter to keep in-mind while developing this. So to make sure that the car I have put my 'dumb driver' in is actually behaving in the right way, I sifted through some data from some runs and found evidence that he is indeed putting the car into a HUGE 4-wheel slide (drift if you're a ricer). Though he is a little smarter than I anticipated. You can see some correction eventually, but I think that has to do more with the car was pointing the wrong way. Any ways. In the picture below, you see the "Velocity" graph, notice how the yellow line drops and the magenta line also 'drops'. The magenta line goes from near 0 to -40ft/sec. That is because the car has turned sideways about 30 degrees and now (from the car's point of view) the x velocity is about 20 and the y velocity is about 40 as well, which evens out to the total of 50 it was at before (these are vectors, you add them sqrt(x^2+y^2) = total). So by the time the kart has turned, it has slowed from about 48 down to a total of 44 ft/sec. Then you see the total velocity decrease towards 0 as the car skreeches to a near stop and the driver recovers.


So the model seems good so far... Once I get the matlab fixed, I should be able to input an actual track path. Then let the car drive it. Then it is time to teach the driver how to 'discover' the best possible driving line and speed.


Friday, April 29, 2011

I've been busy, but not away

I have been busy mathematically modeling my kart. The general public doesn't realize exactly what engineers do. So here's the quick and dirty.


Math can be used to describe anything. From how much weight a rope can hold, to how fast a car can drive, or I have even come across some equations in my day, that I would describe as 'beautiful'.

So when modeling something like a go-kart, engineers can literally "build" the kart out of math. The trick is describing it well enough to be accurate, but general enough to be solvable. So I make a couple of equations to describe how my motor behaves, how my tires behave, even make an equation that I have 'taught' how to drive a stupid car.


The results have JUST hit bare bones. BUT, I can now start modifying, tweaking, and eventually, predict how any given change to my kart will effect its performance. I will finally begin to fill-in some of that 'black magic'

Below is a picture of what it can be like to 'build a kart out of math'. The program is called 'simulink' and it is very mathematical yet it makes combining chunks of 'code' into a neat little picture. The graphs you see are just some performance parameters I was observing. The graph in the bottom right is how much each tire has deformed as a function of time. You can see how the kart is rocking around as the kart turns left and right. Left is the path, programed a command path which was somewhat arbitrary. In the background you can see some of the systems I have built to describe all sorts of various aspects of what it takes to drive a car.


So I will be playing with this tool HEAVILY and will hopefully post some movies of it in action soon.


Monday, March 14, 2011

Repairs and modifications are almost complete

I was planning on writing a technical article for this post, but it got to be about 10 pages of explanation of how to calculate a great deal about the performance of a tire; then, I honestly got bored or writing. I'll save it and post it someday after I've completed the whole study and actually validate my software on the kart. I'm hoping that once I've finished the code, it will predict my lap times based on the set-up. Coding and deriving all of this has been very entertaining, but writing the post became a bear. It'll take a while to complete, so until then, I'll just entertain myself with big loud noises and lots of speed.


So new hardware has appeared at my door thanks to the birthday gnome. A new Righetti radiator to replace the other..... thing.


Here are the two radiators laying side-by-side.


The new radiator is slightly larger but is also a better design over all. It will also close the loop on all the places the kart could be leaking water from. I will keep the old as a spare, but hopefully this will close the chapter on cooling system issues.


The first task of the day though was to put in the fuel return line from the fuel pump. Up until now, the return line was blocked off and therefore was trying to send all of the fuel to the carburetor. The motor I am using was designed to only have a small amount of pressure at the carburetor. Doing this should, in the end, make the fuel delivery more steady and along the lines of how the motor was designed to operate. In the pictures below the green-blue fuel line is the fuel return line.


IMAG0072


IMAG0079


IMAG0078


Then came mounting the radiator. This required some elbow grease and some scrounging around for parts. A simple vice-grip is on my 'to-buy' list.


IMAG0119


IMAG0099


A small amount of re-threading of one of the steering connection rods was also in order. I replaced the rod-end bearings as well. The first picture is the red end with the tapping device attached. The second is the reinstalled assembly.


IMAG0127


IMAG0136


All that is needed now is to rework the shifting lever. The shifter has some bad play in the mountings. So when I try to shift gears, sometimes the gear leaver will move quite a long ways without changing gears. However, by the time I notice the gear has not changed, I am already either into the corner and it is too late to change now or I am already around the corner. Either way it costs me a bit of time to mess around with something that should be almost instantaneous.

I'll post pics as that progresses as well. That will all be completed this coming weekend I hope. Then, perhaps, I can head to the track on Tuesday.

Till next time,

-S

Thursday, February 10, 2011

Recent Modifications January 2011

I'm just going to bullet list these changes. I believe that I have acquired enough knowledge about the workings of shifter karts to finally start to write some more technical posts about the 'whys' of karting. After flipping through a good majority of Carrol Smith's three most popular books and after hours of trying to figure out every angle and dimension oh the chassis of this Tony Kart, I feel that it is all starting to make some very time-tested sense. So today's post is mostly about some changes that I have made to the setup of the kart, with a belief reason why I made each of the changes.


Most importantly I changed the steering wheel back to the original. This was for the simple reason that now I will be able to grip the thing correctly. In addition, I can now actually see my gauges. I still don't look at the gauges very often, but now that it is more in my natural line of sight, I might actually be able to keep an eye on the water temperature and thus know if I've sprung a leak again.

Relocated the water temperature sensor. Again nothing huge here, but monitoring the temperature over here places it at one of the highest points in the system. This way if the water levels drop, I will be able to tell much earlier than when the sensor was on the other side right off the radiator. This also organized the wires a bit.
A close look will reveal that two of these tubes are actually venting to open air now. Still have not spent the time to investigate where these two ports lead to, but they are intended to vent to ambient pressure. This will allow for a more tuned fuel flow at higher RPMs and thus allow a greater power band (more power for more rpms means I get to shift less often and that helps me go faster)

Relocated the fuel pump to a more vibrationally isolated position. That is a piece of rubber hose cut along its length to act as a rubber pad. The pump is vacuum driven (blue line) from a port behind the carb (low pressure). The 'fuel-in' is on the bottom left, 'fuel-out' is bottom right. The reasoning behind moving this here is for both greater service life (vibrations have a habit of breaking things, especially things that move/rotate for a living), as well as smoother performance. Since this pump is a turning wheel on some bearings, if I can reduce the amount of shaking it experiences, the pump will do its job much more smoothly and deliver power to me in a much more predictable and reliable fashion. Again, a small change, but there are many small things to update on this.
This is where the fuel pump was moved from. It is right next to the engine and directly under the exhaust header (the port coming right out of the engine, seen in the top right of the picture). What you see here is the ignition computer. The pump was right on-top of it and the two were held in place with the bolts you see. The white metal plate was added to maintain the location of the ignition computer. This too would have been moved if the cables were not so short. These electronics should not suffer too greatly from the vibration of the motor.
Now for some real changes:

Front and rear wheels moved INWARD 0.8 inches on each side. This is a major tuning change to the setup. While it may not sound like much, most real racing cars might be able to move their wheels in and out by this much as most, this kart is 1/4 their size.

Discussion about why:

Pushing the front wheels in will shorten the lever arm from the center line of the kart to the point of contact with the road. By shortening this length the normal force (the amount of force going directly into the road, as opposed to the force going perpendicular) will have to be increased to accommodate the rolling moment of the kart in a turn. Normally people try to push the tires as far OUT as they can to prevent the car from rolling over. Makes sense, but in this case I couldn't make this kart flip over if I tried. They are SO wide that I can afford to narrow up the wheels and not roll over.

What does all this mean? When anyone turns a car, you probably feel the car want to roll (lean over) towards the outward direction of the turn. The force that causes this leaning, is known as the rolling moment (a moment is a force that causes a rotation, as opposed to moving in a straight line. You might know this term as 'torque'). This rolling moment is countered by the normal force on the tires. Otherwise you would just keep rolling over, this is what is happening when a car rolls over, the tires have lost the power to push back against the rolling moment of the car. By pushing the wheeling INWARD, the force on the tires to push back against this rolling moment will have to be GREATER since the 'arm' is shorter.

With this greater normal force on the tire, the kart will GAIN traction since friction depends how hard you push down against the surface (normal force). With more traction, the harder I can corner.

The rear tires also were moved in for similar reasons, but also to help the body of the kart roll more easily. I will discuss the body roll in a kart some other time as well.

Edit: Another side effect of pushing in these tires will be that the inside rear tire will not be unloaded as effectively on the initial turn in. The original plan was to also reduce the stiffness of the rear chassis (via a small bar you can twist to increase or decrease the twist about the axial). However, since I moved in these tires, I am going to have a lot of trouble making the initial turn-in if I don't leave the rear end stiff enough to unload the inside rear tire. So that will be moved from 100% stiffness to only 75% stiffness initially. I will certainly discuss my findings after the next practice session. 


Steering arms were moved to a lower gain position, the height of the arms was lowered to flatten out the link between the steering column and the pinon arms. Leveling this link and lowering the steering gain, fixed a problem before of a non-linear response at high turn angles. While unlikely to impact normal conditions, fixing these issues could only improve the over-all performance.
*** A very important draw back to the last two changes. The draw back to moving the tires inward, and reducing the gain on the steering column will be that I will indeed LOSE some of the feel with what is happening at the front tires for certain 'kinds' of disturbances, while other will remain the same. I will describe the different forces involved in this 'feel' in my first technical post which will deal with nothing but tires. However, for now I can tell you that the reduced returning moment (the force that makes the tires want to point 'straight ahead') felt in the tires as they start to break lose from turning too hard (too high a 'slip angle' or 'alpha') will not, or at least should not, be reduced since it acts very nearly perpendicular to the rolling plane of the tire. Therefore, the distance this plane has from the axis of the king-pin is immaterial since it is parallel to the moment arm. However, the 'feel' under breaking of one tire giving way before the other, will become less sensitive. I will elaborate on these forces in my next post, which is taking quite a bit of time. I have been deriving, simulating, then confirming my results against various publications. This takes time. But for the true nerds out there, I hope we can all rejoice.***


That's the changes made so far. Before the next race though I still need to do the following:

-Fix brakes, or maybe learn how to use them correctly (bleeding completed, they are now as hard as a rock. I am going to give a 'vacuum bleeder' a shot, and if that doesn't work, I'm going to make my own damn tool because this should take 5minutes at best and be near perfect every time)
-Fix shifting lever, it is really loose and difficult to reliably shift
-Insert fuel return line
-Acquire and install new radiator assembly (new radiator acquired)
-Lower camber angle?


So until next time,

-S

Wednesday, December 22, 2010

Very short update

I haven't made much time to work on the kart lately, but it hasn't stopped me from learning about every nut and bolt.

Here was one of today's discoveries and I am going to share it so that no one else will make the mistake.

As you recall I switched my o-rings in the brake system to o-rings made of a much harder and chemically resistant material called Viton. Turns out that the brake fluid that I am using, DOT-4 is glycol-based. Which cause the viton to swell, melt, and fail over time. So the solution is to switch to the silicon based DOT-5 fluid and replace all of the o-rings again. 

It's science,

-S


Update on this effort: After inspecting all of the viton rings, i could find no immediate evidence of swelling. However the use and temperature conditions were minimal. I did not replace any of the o-rings, but i did clean each one, and flush out the brake system of all DOT4 fluid and replace it with DOT5.